Enhancing LTI with OAuth2
What is OAuth2?
Some LMSes support the standard OAuth2 protocol for authenticating requests to their APIs. This allows LTI® tools to make API requests on behalf of a user, with the user's permission. These APIs often have way more features than the standard LTI protocol supports, like advanced grade manipulation and accessing content that is outside of the LTI scope. If these features are needed by your tool, complimenting LTI with OAuth2 is the way to go.
Here's a list of LMSes that support OAuth2 (that we are aware of):
- Canvas
- BrightSpace (D2L)
Check with the LMS manufacturer to see if they support OAuth2. If they do, then our service will work with that LMS.
Typical OAuth2 Flow
- Much like the LTI registration process, OAuth2 needs to be registered with both LTIAAS and the LMS.
- Once registered, the LMS will provide a client ID and client secret, which you will enter in to the LTIAAS Portal.
- After the client ID and client secret are configured, you simply redirect the user's browser to the LTIAAS-hosted OAuth start URL.
- LTIAAS handles the whole OAuth handshake process, including redirecting the user to the LMS for authentication and obtaining the access token.
- LTIAAS will redirect the browser to a URL that you specify in the LTIAAS Portal. That URL will contain a query parameter that you use to obtain the access token from LTIAAS.
- Once you have the access token, you can use it to make API requests on behalf of the user, use the LMS's APIs.
OAuth2 Setup
Before you can set up OAuth2, you need to add this option to your plan. When setting up your account, make sure to select a plan that includes OAuth2 support, or upgrade your existing plan.
The first step is to register the OAuth2 configuration in both LTIAAS and the LMS. The exact steps for this will vary depending on the LMS. For this example, we'll show you how to do this with Canvas.
- In the Canvas LMS, navigate to the Developer Keys section.
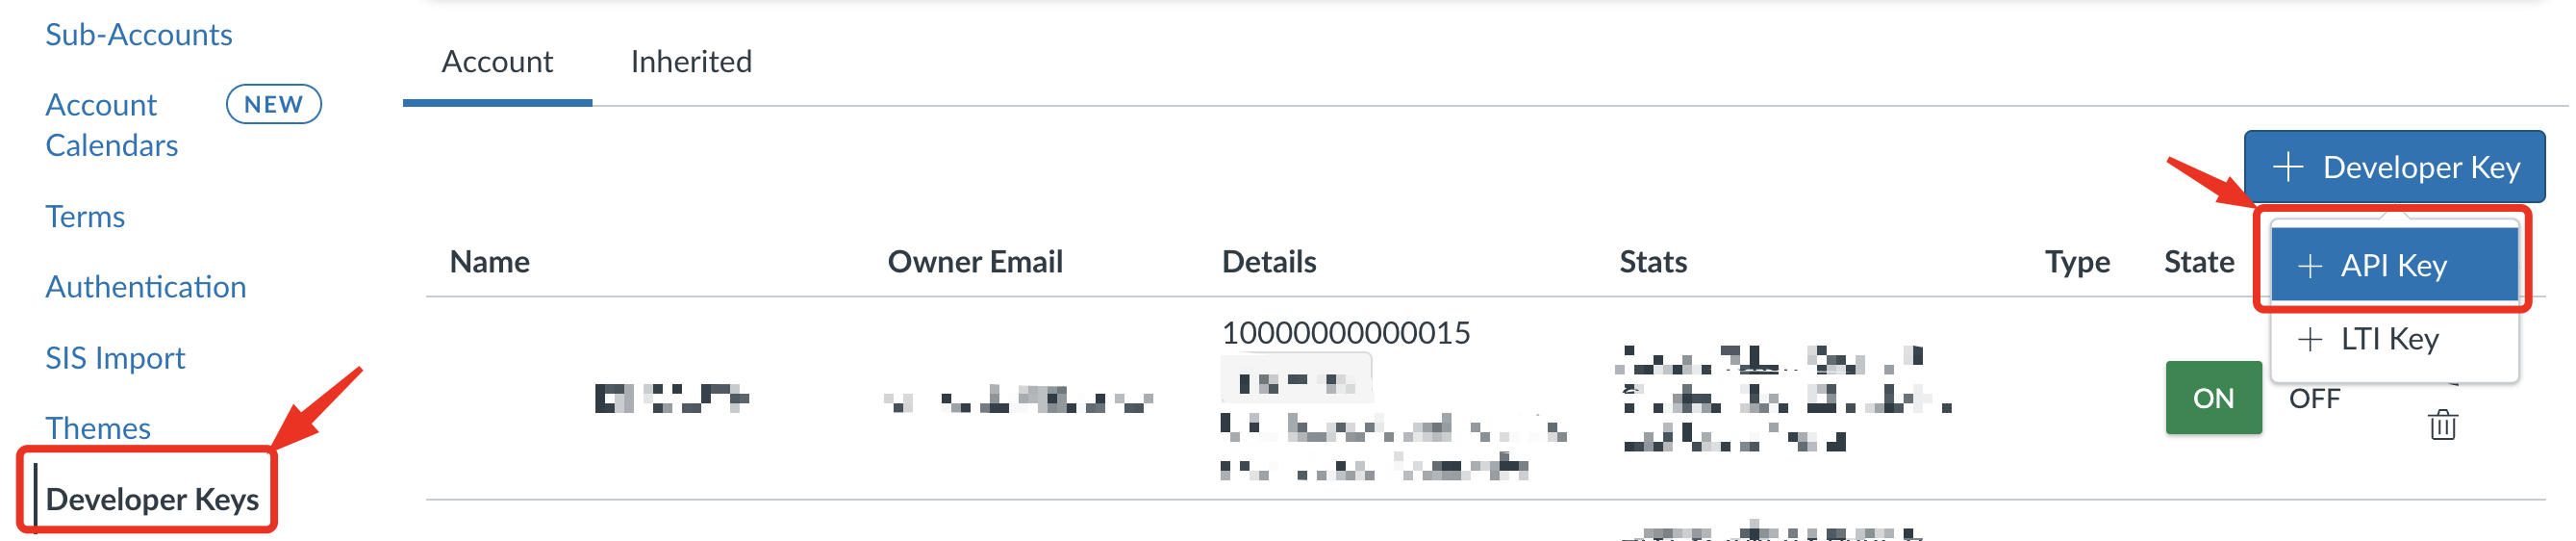
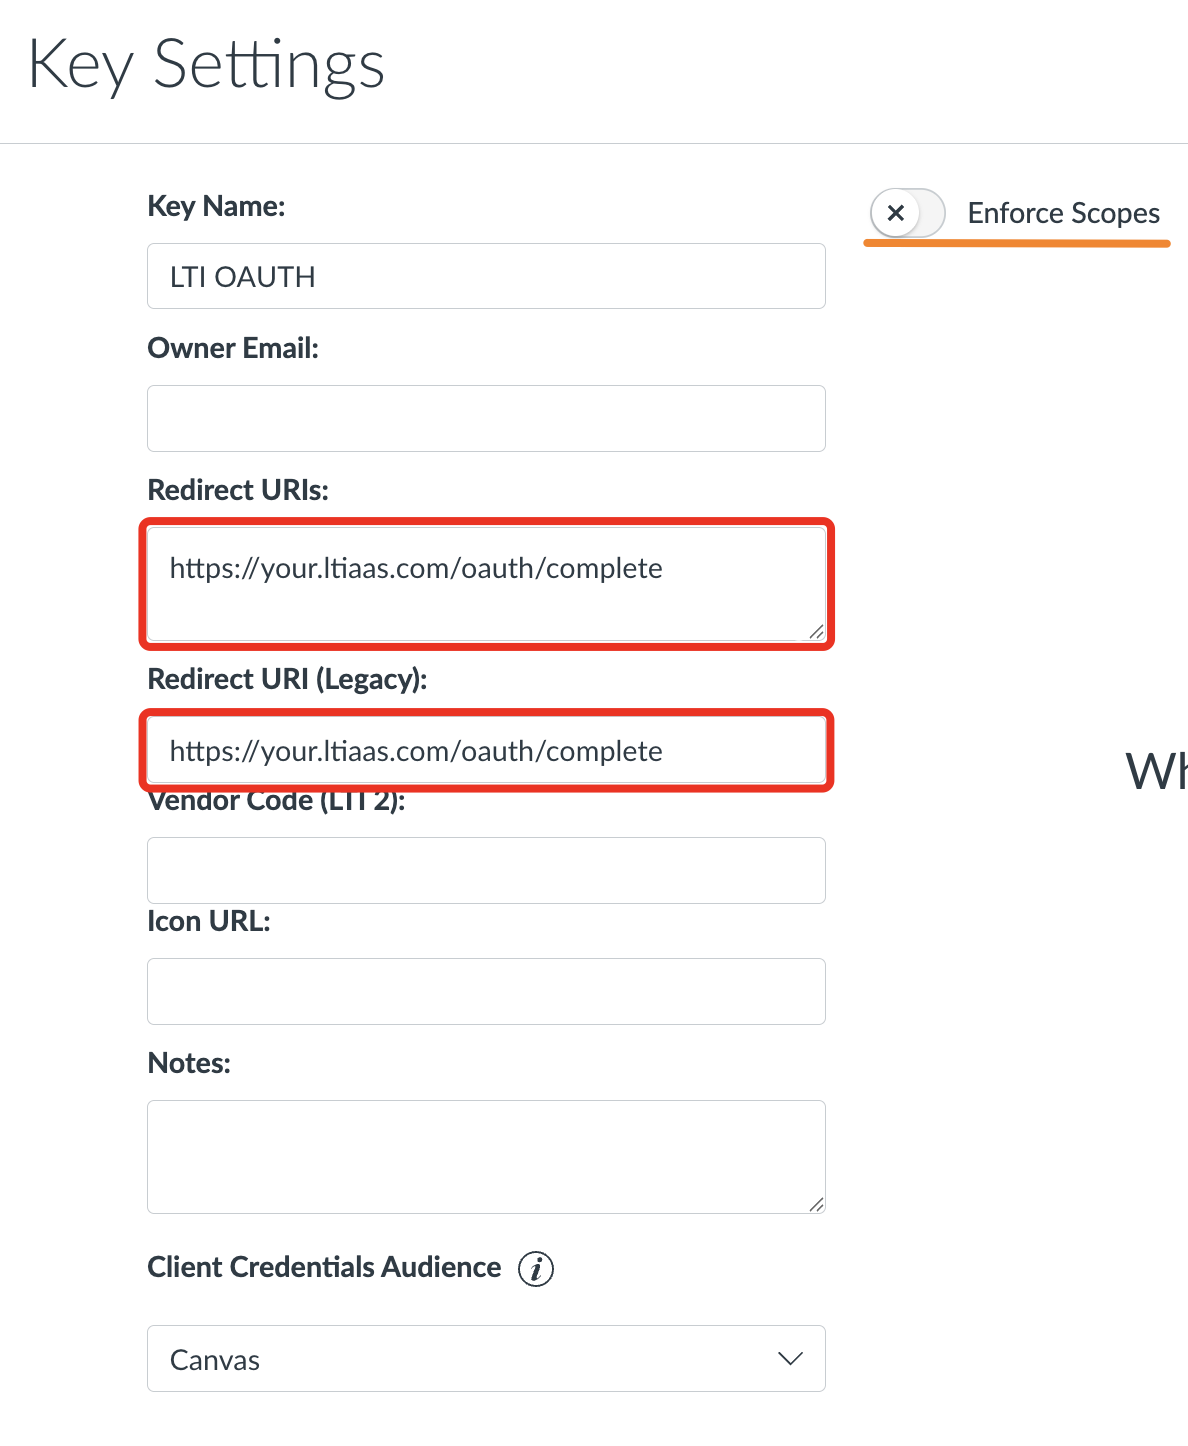
- Fill out the form with whatever names and descriptions you want. The important part is the Redirect URI, which should be set to:
https://your.ltiaas.com/oauth/completewhereyour.ltiaas.comis replaced with your LTIAAS account's subdomain. Some LMS admins will want to limit the scope of your API access, so ensure that they know which APIs you plan to use if they enable any Scope Enforcement feature.
- Once the key is created, make note of the client ID and client secret. In Canvas, the secret can be found by clicking on the
Show Keybutton in the details column of the key that was just created. The client ID is the number shown above the button.

- Enter in the client ID and client secret into the LTIAAS Portal along with the LMS's URLs. In the LTIAAS Portal, navigate to the
Registrationspage in the left sidebar and either add a new registration or edit an existing one.
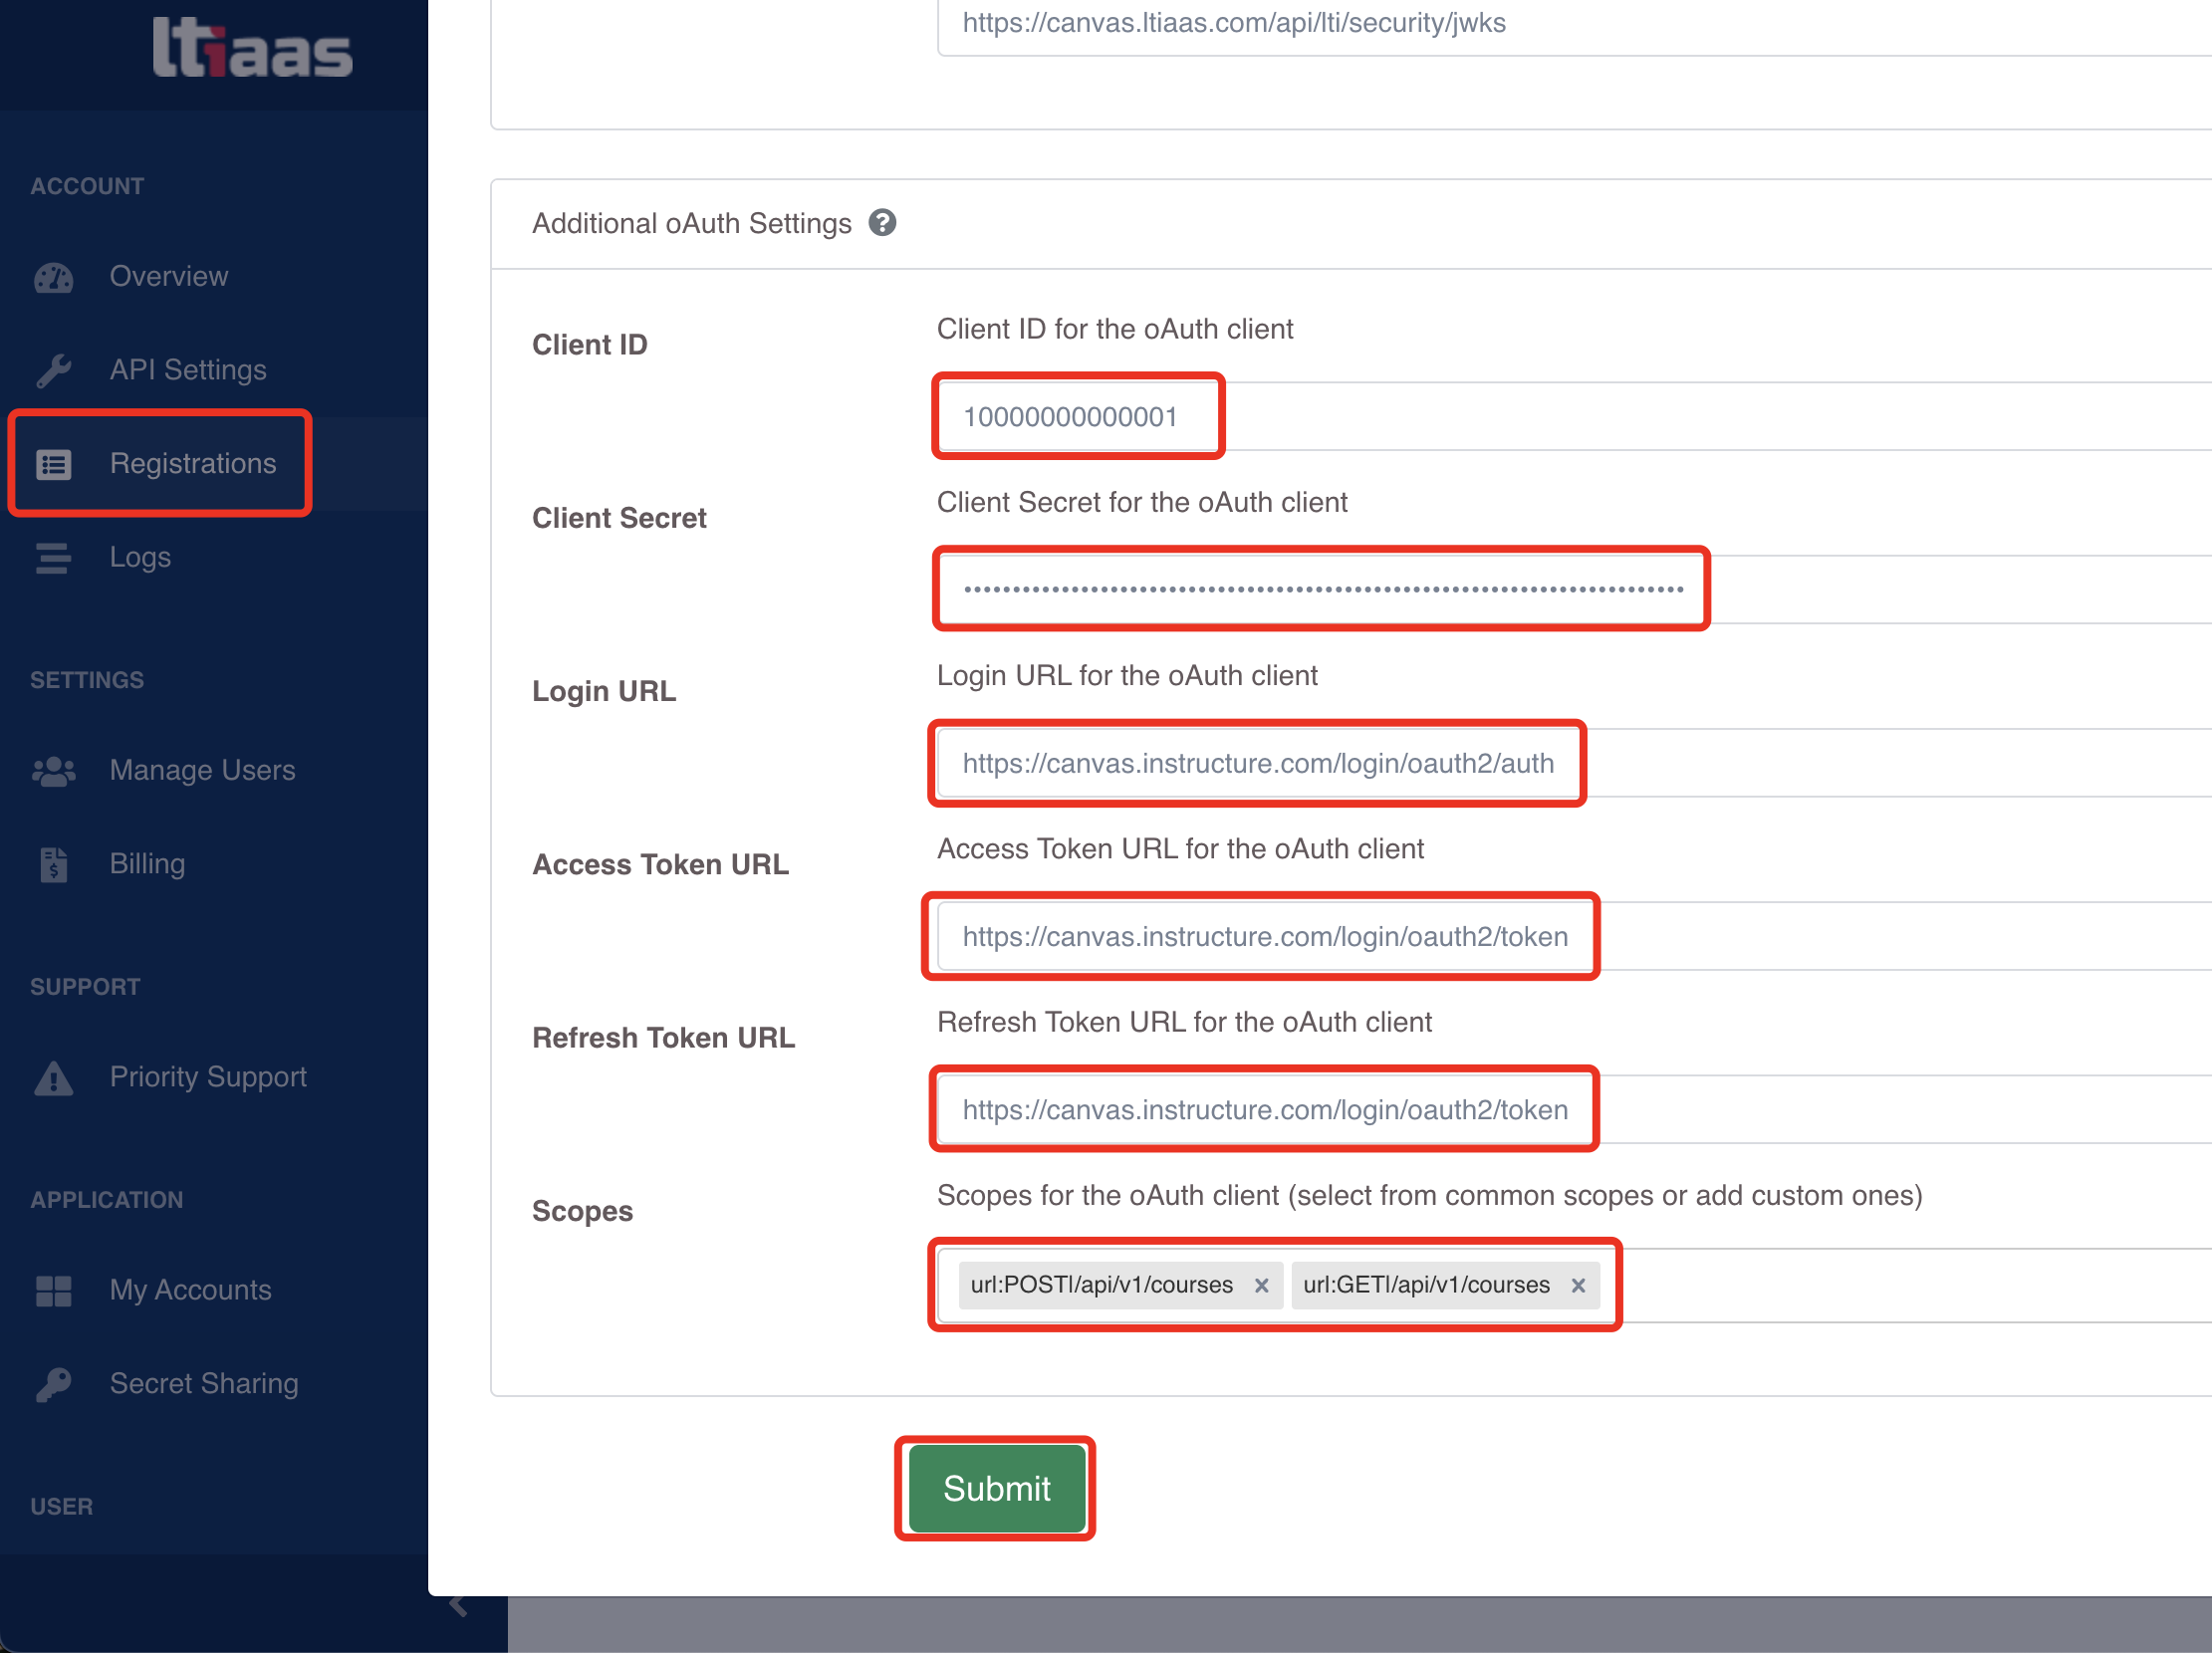
Client ID: The client ID provided by the LMS.
Client Secret: The client secret provided by the LMS.
Login URL: The login endpoint URL for the LMS. (For Canvas, this is
https://[server-url]/login/oauth2/auth)Access Token URL: The token endpoint URL for the LMS. (For Canvas, this is
https://[server-url]/login/oauth2/token)Refresh Token URL: The refresh token endpoint URL for the LMS. (For Canvas, this is
https://[server-url]/login/oauth2/token)Scopes: The scopes that your application requires. (For Canvas, this might include
url:GET|/api/v1/courses/:course_id). Each API listed in the Canvas docs will tell you what scope it requires.Finally, if you are using OAuth without an LTI context, this is supported, but you will need to enter in 'dummy' data for the LTI related information in the LTIAAS registartion form.
Generating An OAuth2 Access Token
Make sure you've read about authenticating API requests before proceeding to the guide below.
The OAuth2 API endpoints only accept the Bearer API Key authentication method.
To start the token generation process, you need to redirect the user's browser to the LTIAAS-hosted OAuth start URL. This could be done with a button on your website, for example. You must redirect tio the following URL: https://your.ltiaas.com/oauth/start/{platformId} where your.ltiaas.com is replaced with your LTIAAS account's subdomain, and {platformId} is the ID of the platform you want to connect to (found in the LTIAAS Portal registration).
<a href="https://your.ltiaas.com/oauth/start/123">Connect With Canvas</a>
The /oauth/start/{platformId} endpoint supports optionally sending a list of scopes to the LMS, otherwise the list of default scopes will be used. For example:
<a href="https://your.ltiaas.com/oauth/start/123?scope=SCOPE1,SCOPE2">Connect With Canvas</a>
Receiving OAuth2 Access Token requests
After initiating the OAuth2 flow, the LMS will redirect the user back to the specified Redirect URI with an authorization code. Your application must handle this request and exchange the authorization code for an access token.
You must implement a server-side endpoint to handle the redirect and exchange the authorization code for an access token.
- In the LTIAAS Portal, navigate to the
API Settingspage in the left sidebar. - In the
OAuth Redirect URLfield, enter the URL of the endpoint you created to handle the redirect from the LMS. This URL must be accessible by the user's browser. - Save and deploy the settings.
Your provisioned URL will receive two query parameters:
authorizationCode: The LTIAAS-specific code used to retrieve an access token for the current user.platformId: The ID of the platform that this user has connected from.
Use these two variables to request an access token from the LTIAAS API.
Always make Authenticated API requests from your server, never from client-side code. This is to ensure that your API key remains secret.
The API endpoint for retrieving an accessToken is /api/oauth/access-token/:PlatformId.
// Data we will send
const receivedAuthorizationCode = 'your_received_authorization_code'
const platformId = 'your_platform_id'
// Building Bearer token based API authentication header
const authorizationHeader = `Bearer ${API_KEY}`
const headers = { Authorization: authorizationHeader }
// Making /api/oauth/access-token/:Id POST request
const authData = {
  authorizationCode: receivedAuthorizationCode
}
const response = requests.post(`https://your.ltiaas.com/api/oauth/access-token/${platformId}`, authData, { headers })
const accessToken = response['accessToken'];
const refreshToken = response['refreshToken'];
const expiresIn = response['expiresIn']; //number of seconds
This request will return an access token that can be used to authenticate API requests on behalf of the user. The response format is:
{
  tokenType: string, // typically "Bearer"
  accessToken: string,
  expiresIn: string,
  refreshToken: string,
  ...: // All other parameters from the raw access token sent by LMS
}
Managing Access Token Expiration
Access tokens are short-lived and will expire after a certain period (depending on the LMS). To ensure uninterrupted access to the API, you should implement a mechanism to refresh the access token using the refresh token. In some cases, the tokens expire in as little as 1 hour.
- When you receive the initial access token response, store the
refreshTokenandexpiresInsecurely. - Before making an API request, check if the access token is expired. If it is, use the refresh token to obtain a new access token.
The API endpoint for refreshing the access token is /api/oauth/access-token/:PlatformId/refresh.
Here's an example of how to refresh the access token:
// Data we will send
const refreshToken = 'your_stored_refresh_token'
const platformId = 'your_platform_id'
// Building Bearer token based API authentication header
const authorizationHeader = `Bearer ${API_KEY}`
const headers = { Authorization: authorizationHeader }
// Making /api/oauth/access-token/:Id/refresh POST request
const authData = {
  refreshToken: refreshToken
}
const response = requests.post(`https://your.ltiaas.com/api/oauth/access-token/${platformId}/refresh`, authData, { headers })
const newAccessToken = response['accessToken'];
const expiresIn = response['expiresIn'];
// the response is the same as the accessToken API, with the exception that the accessToken itself is not returned
By implementing this token management strategy, you can ensure that your application maintains access to the API without requiring the user to re-authenticate frequently.
